Sunlounger
General
Astrophotographers generally uses four types of calibration frames to remove noise and unwanted artifacts (e.g. dust bunnies) — bias frames, dark frames, flat frames and flat dark frames.
Quick Definitions:
Bias frames
Bias frames are dark frames taken with the shortest possible exposure time and are used to remove the base level of sensor read out noise. The temperature, gain and offset should match the light frame exposures. Some CMOS sensors such as the MN34230 used in the ASI1600MM do not give consistent bias results. In these cases bias frames can't be used and flat frames are corrected with flat dark frames (although the method can be used in place of bias corrections regardless of type of sensor)
Dark frames
Dark frames are exposures taken under the same conditions of temperature, gain and offset as the light frames, and are used to correct for the thermal noise that builds up during an exposure. The camera doesn't need to be in the imaging train when this is done provided all light is excluded. It's usual to prepare a library of dark frames covering the expected exposure range, which can then be re-used for multiple imaging sessions
Flat frames
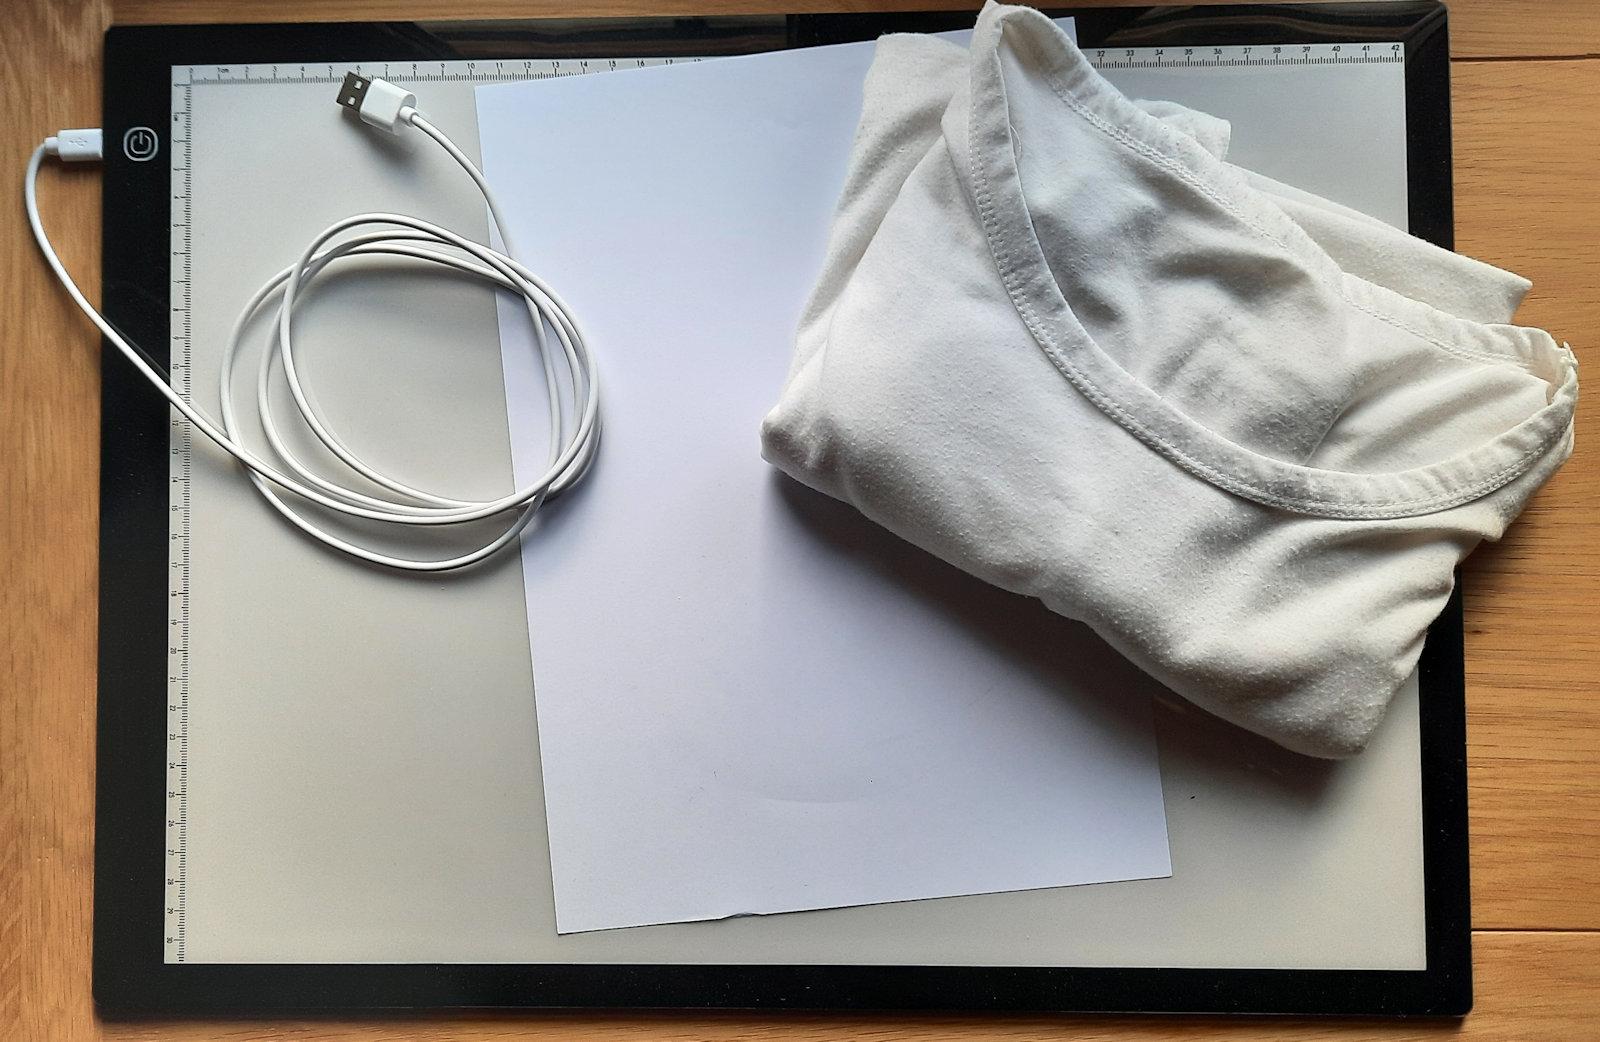
Flat frames are used to correct for blemishes in the imaging train such as dust and vignetting. There are a number of ways to take flat frames — sky flats, dedicated flat panels and diy panels. These days I use the bits shown in the photo consisting of an A3 LED tracing panel in combination with sheets of white paper and a white t–shirt. Previously I've used an EL Panel until I damaged it and changed to my present setup. Since the EL Panel used a 12V supply I found I could use either a 9V or 5V supply to give a dimmer output.
Flat frames are taken with the setup in exactly the same configuration as when the lights were taken — one set for each filter (to correct for the individual blemishes / dust spots) at the same focus as the respective light frames and with the camera in the same orientation (to correct for dust spots on the sensor etc)
The light panel can be dimmed and the strength of the light can also be adjusted by using the t–shirt and any number of sheets of paper. Ideally the flat frames should have a mean ADU of around one third to one half of the maximum ADU range. For my camera (ASI 1600MM Pro) the maximum ADU is 65535 so a mean ADU of around 25000 works fine, making sure the minimum exposure is above one second to avoid the issue mentioned above with the sensor behaviour
Flat dark frames
Flat dark frames are used to correct for thermal noise in the flat frames with the same exposure times as the corresponding flats, and should be exposed with the same temperature, gain and offset as used for the flat frames. In general it makes life easier to use the same camera settings for all the calibration frames
Preparing the master frames
Having captured about 50 each of dark (at conditions equalling the lights), flat, and flat dark frames they need to be corrected and combined to produce the master calibration frames
1 — Master Dark Frames & Master Flat Dark Frames
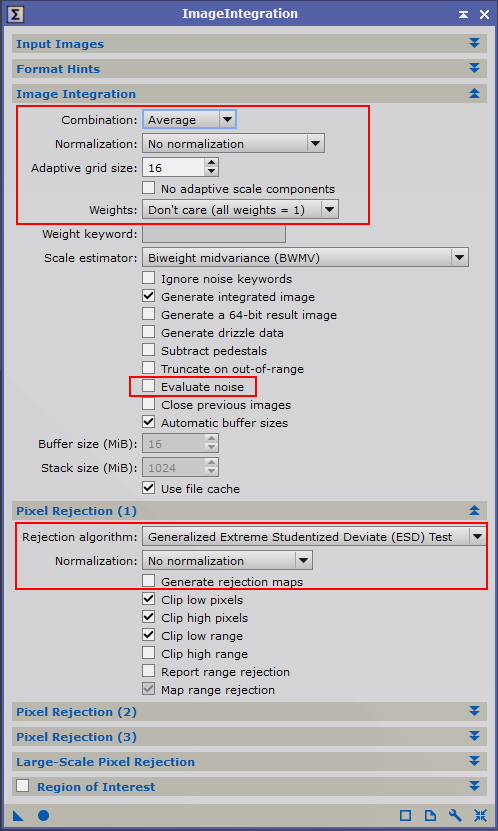
Each set of dark frames needs to be integrated into a single master dark frame. After adding the dark frames under 'Input Images' make the following changes to the default settings:
Under 'Image Integration' :
- 'Normalization' : select 'No normalization'
- 'Weights' : select 'Don't care (all weights = 1)'
- 'Evaluate noise' : de–select
Under 'Pixel Rejection (1)', based on integrating more than about 25 frames:
- 'Rejection algorith' : select 'Generalized Extreme Student Deviate (ESD) Test'
- 'Normalization' : select 'No normalization'
- 'Generate rejection maps' : de–select (optional)
2 — Calibrate Flat Frames
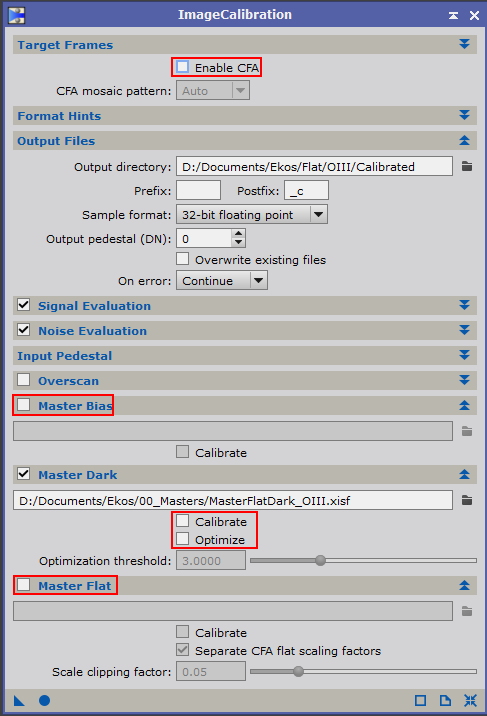
Each set of flat frames needs to be calibrated using the corresponding master flat dark frame. Add the flat frames under 'Target Frames', select an output directory under 'Output Files' then make the following changes to the default settings:
- 'Enable CFA' : de–select
- 'Master Bias' : de–select
- 'Master Flat' : de–select
Under 'Master Dark' :
- Select the directory where the Master Flat Dark is stored
- 'Calibrate' : de–select
- 'Optimize' : de–select
Note the remarks in the tool tips for 'Signal Evaluation' and 'Noise Evaluation'
3 — Create Master Flat Frames
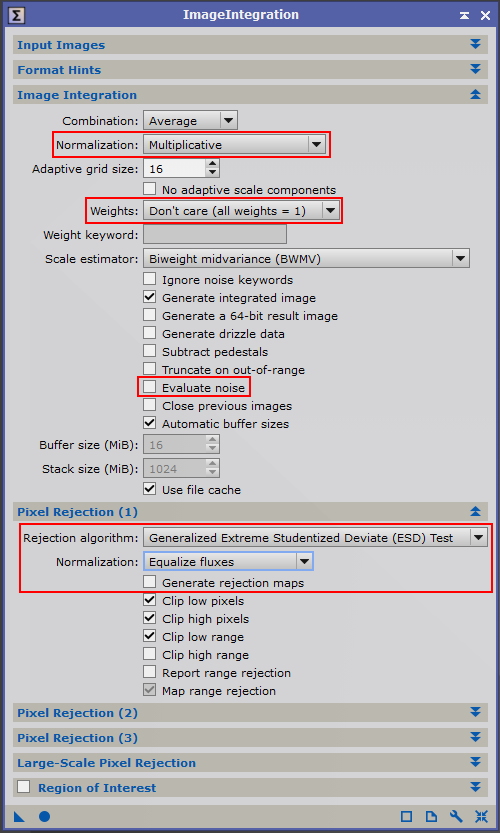
Once the individual flat frames for each filter have been calibrated they can be integrated to create a master flat for that filter. Select all the calibrated flat frames for one of the filters under 'Input Images' and make the following changes to the default settings:
Under 'Image Integration' :
- 'Normalization' : select 'Multiplicative'
- 'Weights' : select 'Don't care (all weights = 1)'
- 'Evaluate noise' : de–select
Under 'Pixel Rejection (1)', based on integrating more than about 25 frames:
- 'Rejection algorith' : select 'Generalized Extreme Student Deviate (ESD) Test'
- 'Normalization' : select 'Equalize fluxes'
- 'Generate rejection maps' : de–select